How to Auto Populate Splash Forms From MailChimp, Marketo, HubSpot, Salesforce Pardot
It feels good to be personally invited to an event. It makes you feel important. It makes you feel like you have value. Someone out there in the world knows who you are, and they're specifically requesting your company.
How thoughtful!

Ok, so perhaps I'm laying it on a bit thick here, but it's safe to say that creating a more personalized and convenient experience is always a good thing for everyone. After all, an invitation is often the first experience your guests have with your event.
One of the easiest ways to accomplish that extra bit of bespoke polish for your invitations is by pre-populating the event registration form. Doing this removes the need for the guest to fill out yet another form, and makes them feel just a bit more considered in the process.
If you're using Splash for both your event registration and your invitation emails, this is literally a bit of functionality you can turn on with a check box.

However, you can't send invitation emails through every system. There's a huge number of reasons why you might need to use dedicated email marketing platforms like Marketo, HubSpot, Eloqua, Pardot, MailChimp, etc. Perhaps you have policies around how often non-transactional emails can be sent to contacts. Maybe compliance with GDPR means your organization has made the decision that all emails go through one tool.
Whatever the reason, you may not have the choice of where your event invitations are sent from. But, if you want to keep the 'auto-populate' experience, you can do it!

Get Your Splash Form Field URL Parameters
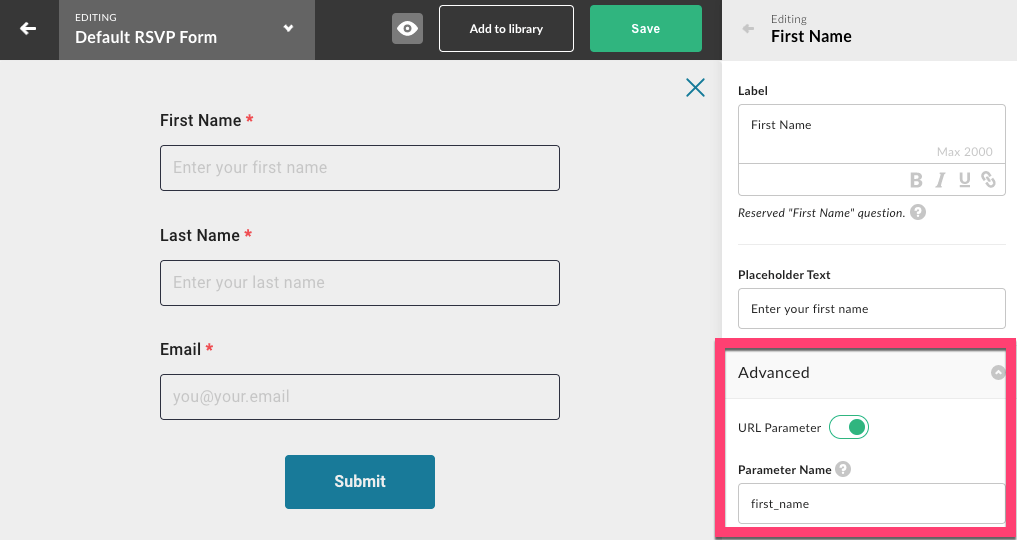
Every Splash Form Field has an 'Advanced' section in it. In there, you can control whether a field can be populated by a URL Parameter, and what the parameter is called.
The default fields always start with these default URL parameters:
- first_name
- last_name
You can change these, but there's not much of a reason to. Just make sure the little toggle switch is on (green means it's on).
Find The Corresponding Merge Tags in MailChimp
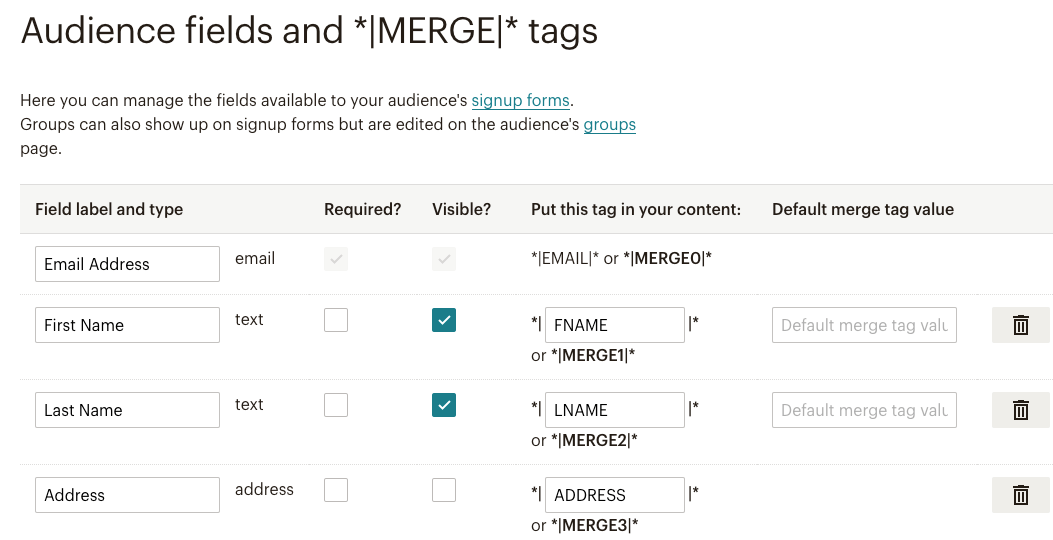
Once you've collected all the parameter names for the fields you want to fill out, find the corresponding Merge Tags in MailChimp.
- Open the Audience Section
- Click on 'Settings'
- Select 'Audience fields and *|MERGE|* tags'
By default, you have simple and obvious tags like:
- FNAME
- LNAME
- ADDRESS
You can always change these to something custom, but there's not much of a reason to here either.
Every marketing platform tends to have a similar approach to MailChimp's Merge Tags. In Marketo, they're called Tokens. In HubSpot they're called "Personalization Tokens".
Configure The URL Of The Call To Action Button

Now that we have the URL parameters for your Splash fields and the Merge Tags from MailChimp, we can combine them in the call to action URL.This is essentially the trickiest part in the whole process.
Make sure you get the syntax of the Merge Tags (or whatever the equivalent is in your platform). And for good measure, try and keep everything case sensitive. Uppercase vs lowercase has been the cause of many a frustrating afternoon.
Send The Email

You've done it! When your guest receives that invite, their form will already be completed with as much information as you passed to the form. While we described this for MailChimp, the same principal can be used for HubSpot, Marketo, Eloqua, Pardot, and many other platforms.
This technique can be used for all sorts of additional tricks, which we'll definitely be covering in the future.
Contact Us
Whether you're looking for help on connecting your sales and marketing systems the right way, or just have a suggestion on something we should cover, the Sync Foundry team would love to hear from you.